
One of the lesser-known yet incredibly useful features of Ad Badger is the ability to pin columns in its interface. This feature enhances the user experience by allowing for more efficient data analysis and management. In this article, we’ll explore what column pinning is, its benefits, and how to effectively use it in Ad Badger.
What is Column Pinning?
Column pinning is a feature that allows users to "pin" or "freeze" certain columns within a table view. In the context of Ad Badger, this means you can select specific columns of data that remain visible on the screen as you scroll horizontally through your campaign data. This is particularly useful when dealing with extensive sets of data, where key columns such as 'ACoS' (Advertising Cost of Sale), 'Impressions', or 'Clicks' are critical to your campaign analysis.
The Benefits of Column Pinning in Ad Badger
- Enhanced Data Visibility: By pinning important columns, you keep vital information in view at all times, which is crucial when comparing data across a wide table.
- Improved Efficiency: It saves time and reduces the need to constantly scroll back and forth to reference important metrics.
- Customized Data Analysis: Each user can pin columns that are most relevant to their specific analysis needs, allowing for a more personalized approach to data evaluation.
- Reduced Errors: Having key data always visible minimizes the risk of overlooking crucial metrics, leading to more accurate campaign management decisions.
How to Pin Columns in Ad Badger
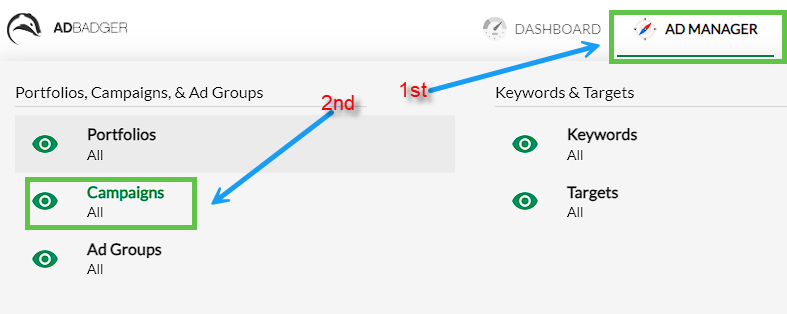
- Access Ad Manager:
- Access your Ad Badger account and proceed to the Ad Manager section where your Amazon Advertising data is presented. From there, select the option that corresponds to where you'd like to pin the columns.
- Identifying Key Metrics: Determine which metrics are most important for your campaign analysis. These could vary based on your campaign goals, whether it’s maximizing visibility, profitability, or managing ACoS.
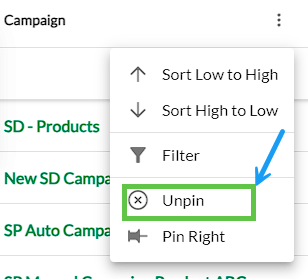
- Pinning the Columns: Locate the column you wish to pin and hover over the column header. A 'three dot' menu should appear. Click on the menu and an option to 'Pin Left' and 'Pin Right' will appear. Select one of these options, and the column will be fixed to the left (or right) side of your table view.

- Adjusting Pinned Columns: You can pin multiple columns as needed.

- Unpinning Columns: If you need to unpin a column, simply select the 'three dot' menu again and select the 'Unpin' option.
Best Practices for Column Pinning
- Prioritize Metrics: Always pin the most critical metrics first. For instance, if you’re focused on budget control, pinning the 'Spend' column might be a priority.
- Review Regularly: Your campaign focus may shift over time, so review and update your pinned columns periodically to reflect current objectives.
- Combine with Filters: Use pinned columns in conjunction with filters for even more efficient data analysis.
- Training and Onboarding: Ensure that new team members are trained on this feature to enhance their efficiency in managing campaigns.
In conclusion, the column pinning feature in Ad Badger is a simple yet powerful tool for Amazon advertisers. By allowing for a more streamlined and customized data analysis process, it enables advertisers to manage their campaigns more effectively and make informed decisions. As you continue to navigate the complexities of Amazon Advertising, leverage this feature to enhance your campaign management strategy.