
The easiest way to sort your data in a preset way
About
Insight into one of Ad Badger’s most powerful features, Ad Badger Filters. We take a quick look around the tool and determine how and why you would use filters in Ad Badger. We will also show you how quickly creating and saving your custom filters is.
Why use filters?
So you got a lot of data, now what? Freak out? Export? No, just jump into Ad Badger and let us help you crunch that data.
Advantages of using Ad Badger filters
Repeatable process. Create pre-set data crunching rules.
Want to see all keywords with ACOS under 10% on a weekly basis?
Once we create a filter, it’s just a click of a button, and your data is sorted in an actionable way for you to digest and take your next steps.
Reporting. Pre-set sub-report for clients or internal team.
Do you need to run a report showing all keywords with more than $500 in sales over the past 30 days?
Get those custom-requested reports built in a few minutes. The next round of reporting will take just seconds to select the filter.
Data within the data. Having all the data is great, having actionable data is better.
Take advantage of Ad Badger’s custom metrics to up your data game. Ad Badger offers RPC (Revenue Per Click) to help uncover additional trends.
RPC is built right into the filter as a selectable option!
Get granular with it. Need to know which keywords result based on 5 or 10, or 25 different filters, Ad Badger can do it.
You can set up a filter with as many dimensions of the data you want to sort and save it for later use. No more macros, Ad Badger will do the heavy lifting.
Pro Tip: Ad Badger's filters work for Portfolios too. Don’t forget you have this option to filter by also.
Long-term data. Sorting beyond Amazon’s 60-day data window.
Need to know what the top 5 product targets are based on sales over the past 180 days?
We got you covered on this too. Ad Badger keeps the data intact for as long as you're continuously connected to Ad Badger. *NOTE: At initial connection, Ad Badger can only gather the past 90 days per Amazon’s available data.
Discover long-term trends or analyze seasonal trends with these long-term data sets.
How to use filters
This is where the proverbial rubber hits the road. First steps first, we need to decide what data we want to see.
What do we sort by?
Level - Our top level of data selection. Do we want data based on performance from campaigns, keywords, product targets?
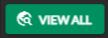
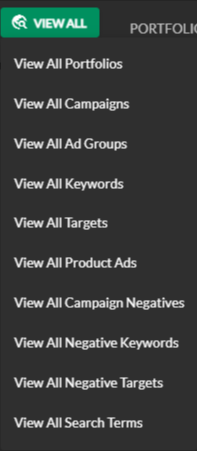
Use the “VIEW ALL” green super search button in the top left corner to select the first level of data.
- Options, options, options-- The type of data from the first level selection allows you variable filter options targeted towards your selection
- Focus-- What are we focusing on? Is it keywords, campaigns, product targets, or auto campaigns?
It all starts with the Green “VIEW ALL” button.
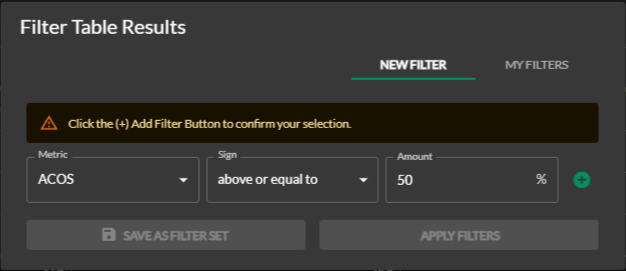
Filters to sort by - What data do we want to see? Do we want to see active, paused, number of clicks, ACOS?
Select your desired Metric, Sign and Amount
This example shows us searching for ACOS above or equal to 50%
Data Goals - What is the purpose of the filter you are trying to create?
Make sure to add all of the Metrics to your list to refine the data
Don’t forget: if you are trying to find data with 10 different Metrics, add them all.
How to create and save filters
It’s like having a superpower. It takes a second to harness your new powers, but once you do, watch out, Amazon data, you’re mine!
First steps first - Once in the Ad Badger system, Click on “AD MANAGER” in the top nav.
Super Search - Next, click on the “VIEW ALL” green super search button in the top left corner.
This will allow you to select and sort by the dimension you are interested in.
These would be Campaigns, Keywords, Product Targets, etc.
NOTE: The default view is “Campaigns”
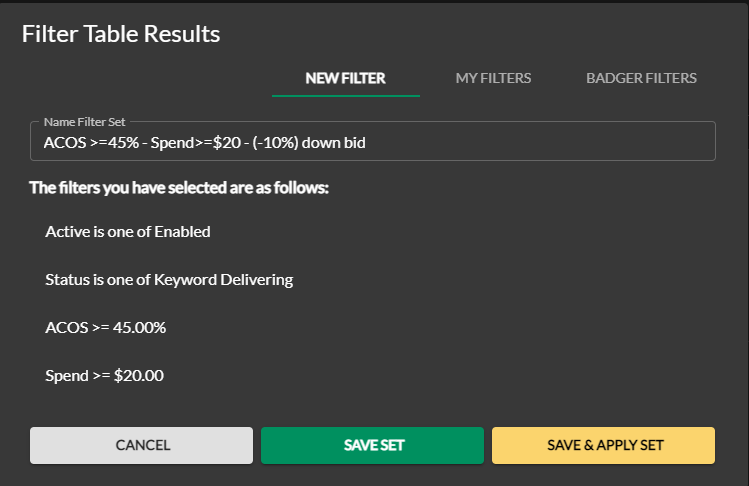
Select Metrics - This is where you create the recipe for the perfect data set.
Click on the filter icon (between the graph and header row).
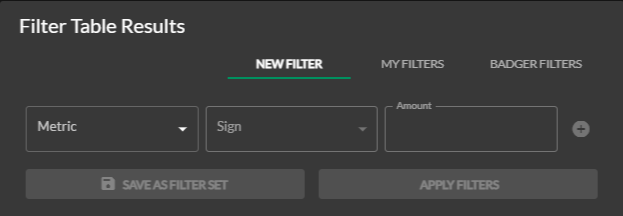
A “Filter Table Results” popup will appear.
Add all of the Metrics, Signs, and Amounts that you are sorting for.
After each metric, click the “+” sign to add to your filter.
Don't forget to add your minimum and maximum thresholds
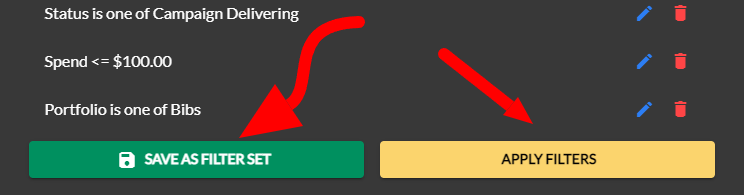
- Use it or Save it - Is this a one-time search or a search you will repeat? This step allows you to run or save your filter. You have two options:
“SAVE AS FILTER SET” = Saved and repeatable filter in “My Filters” area
“APPLY FILTERS” = One-time use filter
Pro Tip: Love the filter you created but didn’t save it when applying it the first time? Save with these steps:
Click the Filter icon
Click the edit button on one of the filters
Hit the “+” sign to add it again
You will now have the option to “SAVE AS FILTER SET.”
Saved Filters - Your filters will be saved in the section you created them. Keyword filters will be accessible only in the “Keywords” section of the Ad Manager.
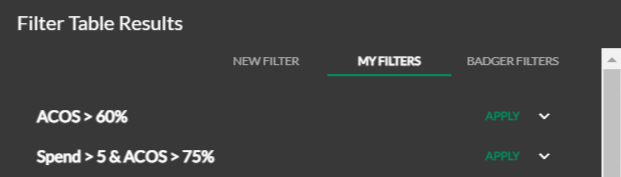
The Badger being the Badger - The Badger has created some prefilled filters for you for some of our most commonly used filters.
Click on “BADGER FILTERS” to view these helpful filters
Click “APPLY” to set the Badger into action
Pro Tip: Harness the power of the Badger by using the Badger Filters as a starting point. Once you apply the filter, click on the filter icon, click “NEW FILTER,” and add your updated metrics. Now you can save it as your own.
Name your filters - Add text cues to your custom filters for easy identification and reference.
Click “SAVE AS FILTER SET” and add your filter name in the “Name Filter Set” box.
Make sure to add a name that helps you remember what data the filter is sorting for.
Pro Tip: Add the action you will repeat to this data set during your optimization rounds. For example, if you are going to down bid all keywords 10% with ACOS over 45% and Spend over $20, add that to your filter name.
Are you a visual learner?
Check out Michael Erickson Facchin’s video about filters here.
Questions?
If you have any additional questions, contact us at thebadger@adbadger.com.